17 Dec

Posted By
0 Comment(s)
7850 View(s)
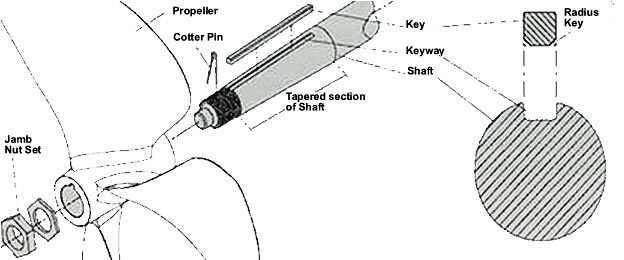
Inboard Propeller Removal and Installation Instructions
These instructions are for "Inboard" marine propellers mounted on tapered propeller shafts.
Concept:
- The propeller shaft is machined with a taper at the propeller end of the shaft.
- The taper is what centers the propeller on the shaft.
- It is critical that the propeller fits properly onto the taper.
- Incorrect fit can cause vibrations and possible shaft failure.
Propeller Removal:
There are various types of propeller shaft tapers, but the SAE Marine Taper is the most common in North America. This taper is 1:16, or 3/4" per foot, and is considered a self-holding taper. Once the propeller is firmly seated onto the taper it is often necessary to use a puller to remove the propeller.
- Remove the cotter pin
- Loosen and remove the thick nut
- Loosen the thin nut and unthread it away from the propeller. Leave the nut on the shaft to prevent the propeller from falling off the shaft when it breaks free of the taper.
- Unseat the propeller from the shaft taper using a suitable puller. Use caution to prevent damage to the propeller shaft and the propeller blades.
- If the puller will not release the propeller, heating the propeller hub will expand it and release it from the taper.
Caution, improper use of heat can damage the propeller.
It is recommended that you use a "soft gas" torch to slowly heat the entire hub evenly.
Avoid heating in one area or on one side of the hub as this can cause a buildup of stress in the propeller material. - Once the propeller is removed from the shaft, carefully inspect the propeller bore and shaft for damage.
This is also a good time to inspect the taper contact.
Areas with good contact will appear clean, and areas with no contact will be dark or discolored. - Remove the key and inspect for damage. Side wear indicates that the propeller was loose on the shaft.
- Carefully clean the propeller bore, and the propeller shaft.
Inspect for defect, and check the shaft for straightness.
Propeller Installation:
- The number one, most important thing, is to ensure that the propeller is properly fit to the propeller shaft taper.
A poor fit can cause the propeller to come loose, or in the worst case, can cause the propeller shaft to break, resulting in the loss of the propeller. - Check the fit of the key into both the shaft and the propeller.
The key should fit tight without any side play, but it should not be so tight that it requires mechanical assistance to install it. - Next, with the key removed, apply a light even coating of Prussian Blue to the prop shaft taper.
Line up the keyways between the propeller and the shaft, and push the propeller all the way onto the shaft until it stops.
Carefully remove the propeller without turning it, and inspect the bore for the correct contact.
A minimum of 80% contact should be maintained between the propeller bore and the shaft taper.
The contact should be evenly distributed, and not all at one end or on one side of the shaft.
You can correct a poor fit by lightly removing material from the high spots indicated by the blueing in the propeller bore. - Once the propeller fit has been confirmed, re-clean the shaft and bore and re-install the propeller without the key.
Carefully mark the shaft with a non-graphite marker, where the forward end of the hub stops on the propeller shaft. - Remove the propeller and install the key in the shaft. Coat the shaft with light oil.
Never use heavy bodied grease or anti-seize compounds as they can prevent proper seating of the propeller onto the shaft. - Install the propeller onto the shaft, making sure it pushes up to the mark you made on the shaft.
If the propeller will not push all the way up to the mark, the key is too tall and it is interfering with the propeller fit onto the shaft.
Remove the propeller and file the key until the propeller fits all the way up to the mark. - Once the propeller is installed with the key and it is lined up with the mark on the shaft, install the thick propeller nut and torque appropriately (depending on the thread size).
- Remove the thick nu and install the thin nut. Tighten the thin nut against the propeller. Install the thick nut and re-torque appropriately.
- Install a new cotter pin (never re-use old cotter pins).
A quick note about propeller jamb nut sets:
The correct way to install is with the thin nut against the propeller.
It is best to do the initial torque using the thick nut, then remove it and install the thin nut against the propeller.
Re-install the thick nut and re-torque it against the thin nut.
This method puts all of the load onto the threads of the thick nut, and unloads the threads on the thin nut, sort of turning it into a washer.
Important Things to Remember:
- Never use heat to install the propeller.
(the heat expands the propeller hub, and when it shrinks as it cools, it can fracture the propeller hub) - Incorrect fit of the propeller to the shaft can cause vibrations and possible shaft failure.
- Never use grease or anti-seize compound when installing (the propeller needs to be fully seated onto the shaft)
- A properly installed propeller will always require a puller to remove it.
If it doesn't, the fit should be carefully inspected.
Leave a Comment